How To 3D Print Assemblies With Moving Parts with Alexei Samimi, Mechanical Engineer at Fathom
As 3D printing becomes increasingly present in the everyday vocabulary of engineers and designers, a new set of necessary skills emerges as well. With so many questions that need answering, the Fathom team is dedicated to sharing interesting information with you as we navigate the frontier of additive manufacturing. One of the many ways that 3D printing shines is in its ability to produce assemblies with moving parts, all in a single build. To investigate this, Mechanical Engineer Alexei Samimi took on the challenge of designing a single assembly of interlocking moving parts for two different 3D printers.
Inspiration
Using 3D printing in the design process has many benefits. For this blog post, I wanted to do a quick project demonstrating how 3D printing allows you to quickly prototype complex and intricate assembled parts by printing multiple components pre-assembled in a single build.

I modeled a bracelet in Solidworks—a six-part 3D printed assembly with paraboloid joints and a fold-over clasp sliding mechanism. I printed the assembly on both a uPrint SE Plus (Fused Deposition Modeling Technology) and an Objet500 Connex3 (PolyJet Technology) and compared the results.
Design Considerations
Clasp Design
To explore how the two machines handle 3D printing intricate assemblies of moving parts, I looked to an everyday mechanism that would be time-consuming and difficult to prototype using traditional methods: the fold-over watch clasp [Figure 1].
A pair of 0.05-inch hemispherical snaps holds the clasp closed. The snap depends on flexure of small snap arms to operate and I was curious how well the uPrint’s ASBplus would compare to the Connex3’s Digital ABS. Both exhibit flexural moduli of 300 ksi.

Joint Type
For this design, I wanted to avoid long through-pins like those found in metallic watch bands. Not only would the tiny 3D printed pins be prone to breakage and wear, but removing support material from the narrow pin holes would be difficult.
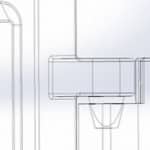
Instead, I employed paraboloid joint pairs: on either side of the band, a paraboloid pin, like the one shown in Figure 2, is mated to a shallow depression, slightly deeper than the pin. Not only would the short pin be more robust, but support material placed between it and the surrounding depression could be more easily removed.

Build Orientation
The orientation of the assembly on the build platform affects the surface finish, tolerances and the strength of walls and extrusions.
Consider the pins in each of the bracelet’s joints: On the uPrint (0.01-inch layer thickness in fine-resolution mode), a 0.07-inch long pin with a base diameter of 0.01-inches, its axis oriented perpendicular to the build platform (Fig. 3), will be composed of seven circular layers. This topography may be prone to shearing, but will turn smoothly in its socket. If the same pin axis is oriented parallel to the build platform (Fig. 4), it will have greater shear strength but lower radial smoothness.

Comparatively, the Connex3 (16-micron layer thickness in fine-resolution mode) will produce a smooth pin in either orientation, allowing more emphasis to be put on surface finish and material efficiency.
Both models were oriented side-down to improve surface finish, maximize support material efficiency and improve radial smoothness of pins in the joints and clasp.
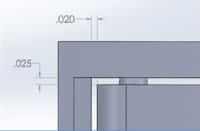
3D printed sliding and interlocking parts will be surrounded by support material and it’s important to consider how difficult and time consuming the support material will be to remove. Providing adequate clearance between parts, as well as minimizing the depth of small holes and channels, will aid in the removal of support material. I kept all mating clearances above 0.02-inches to ensure no fusing would occur between parts [Figure 5].

The Results
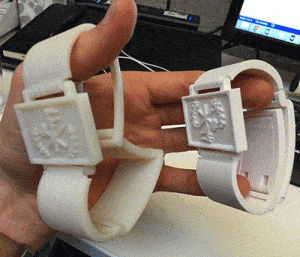
The image on the far right is PolyJet and the snapshot on the far left is Fused Deposition Modeling (FDM).

FDM / / / / / / / / / / / / / /
uPrint SE Plus FDM 3D printer… Nine color options available in ABSplus – an engineering-grade thermoplastic. Operates at either 0.010 inch or 0.013 inch layer thickness for finer resolution or higher speed, respectively.
-
0.01-inches (Resolution)
-
Solid (Fill Density)
-
8 x 8 x 6 (Tray)
PROS / / / / / / / / / / / / / /
Flexible, high-strength thermoplastic is great for snap-fits (flexural modulus: 300 ksi; tensile strength: 4,700 psi). Superior hardness (109.5 HR) is ideal for repeated clasp operation and wearability.
CONS / / / / / / / / / / / / / /
At 0.01-inches, layer topography is visible and if surface smoothness is a high priority, additional finishing may be necessary. A single pin between the band and the bracelet face became dislocated after rough handling. This was due to a combination of the high clearance creating too much play in the joint and the pins short length relative to the layer thickness. This error could be eliminated with slightly longer pins.
POLYJET / / / / / / / / / / / / / /
Objet500 Connex3 PolyJet 3D printer… Choose from hundreds digital materials, 14 base materials and up to 82 material properties in a single build.
-
High Resolution
-
ABS-like (Material)
-
0.00063 inches (Layer Thickness)
-
19.3 × 15.4 × 7.9 (Tray)
PROS / / / / / / / / / / / / / /
High speed, high resolution and smooth matte finish. Joints function smoothly and without fail. The fold-over clasp has been operated many times and still snaps securely into place. Option to 3D print in multiple materials during a single build cycle—an ideal functionality for single-build assemblies.
CONS / / / / / / / / / / / / / /
While digital ABS matches ABSplus in terms of high tensile and flexure strength, its lower hardness (68 RHM) may be less suited to heavy use.
Conclusion
The uPrint created a bracelet I could try on and share with others. The joints moved smoothly and the fold-over clasp snapped in and out of place reliably. Support material was easily removed in an ultrasonic bath in less than 20 minutes. However, due to the machine’s lower resolutions, one of the joints failed due to a pin that printed too short. Aside from the joint failure, the uPrint produced a solid, durable model.
The Connex3 did an excellent job of creating a bracelet that looks and functions exactly as designed. Joints and clasp operated smoothly and the higher resolution of the Connex3 machine could allow for tighter clearances and thus tighter, smoother joints, where the assembly was designed specifically for it. However, the softer material showed light signs of wear after repeated use and I’m concerned that the fold-over clasp mechanism won’t last as long as the FDM version. Support material removal was more labor intensive, requiring careful cleaning in and around tight clearances.
The ability to 3D print assemblies with moving interlocking parts is an exciting addition to the world of manufacturing and we at Fathom can’t wait to see how you explore these new possibilities! Share your creations with us on our Facebook page.
Have a bracelet of your very own to print? Upload your file to our online quoting and ordering system for 3D printing. SmartQuote offers PolyJet, FDM and SLS technologies — just click to print!


